Showing posts with label Silhouette. Show all posts

Monday, April 13, 2015

Paper Issues | All You Need

20150405-IMG_5489_CLN

The newest link party went live on the Paper Issues blog today!  This issue is called “Prints Charming’s Beautiful Papers” and is sponsored by Scrapbook Circle. 

20150405_CLN_AllYouNeedIsLove

I used the March Scrapbook Circle kit “Here’s The Story”.  There are lots of colorful patterned papers in the kit, which works very well with the Paper Issues prints charming theme.  I decided to scrap one of my favorite photos of my cat Noodle that I haven’t scrapbooked yet.  I also used the Scrapbook Circle Be Happy Digital cut files to cut out the “today” banner and adhered it below the photo. 

20150405-IMG_5484_CLN

Part of this Paper Issues link party theme is also “subway art”, so I decided to make my title into some stacked words that I cut out on my Silhouette with patterned papers.

20150405-IMG_5485_CLN

I added in some journaling onto a pink circle punched out of paper.  Date-stamped a label sticker and my layout was complete!

20150405-IMG_5486_CLN

Be sure to link your project to this Prints Charming link party at Paper Issues for a chance to win the March Scrapbook Circle’s main kit!  Great prize!

Read More »

Tuesday, March 24, 2015

One Little Bird | Demystifying The Hybrid Process

20150307-IMG_5406_OLB_CN

Hi Everyone!  I am on the One Little Bird blog today, showing you how I put together my hybrid scrapbook page using One Little Bird digital products.  “Hybrid” can be a mysterious term and not all crafters/scrapbookers know what it means.  The simple meaning is just using printed out digital products on physical projects.  I will show you in this post how I go about doing that.

First I will show you the end product of my hybrid page.  I used Better Together and At Week’s End digital kits.

20150307_Together_OLB

The first step in my process is to do a mock up of my layout in Photoshop.  I do this without adding shadows to the layout, because I will have to print each item later.  Doing a digital layout in PS/PSE first allows me to resize each element to the correct size relative to each other.  It also makes it easy for me to determine what size my photo should be printed at.

20150307_Together_digital

Next, I hide all the layers except for the ones that I’m going to use to print onto my background.  In this case I wanted to print the “i love it when we get together” digital stamps and my typed journaling onto the background cardstock.  I save it as a jpeg and then printed it onto my Bazzill white cardstock.  You can also just print it straight from PS without saving it as a jpeg first.

20150307_Together_print

In the next step, I drag the photo from my layout onto a new 4″x6″ canvas in Photoshop so I can print it out separately onto glossy photo paper.

20150307_Together_photo_screenshot

Next, I hide the photo and all the dimensional elements that I don’t want to print out for my layout.  I will use all real embellishments in place of those items.  That leaves me with just the items that I want to print and cut out.

20150307_Together_Pre_PrintAndCut

Then I drag the pieces onto a new 8.5″x11″ canvas in Photoshop and line them up in the middle of the page.  This creates the print & cut file.  I save the file on the right as a 8.5″x11″ 300 dpi jpeg file so I can open it in my Silhouette Studio software.

20150307_Together_PrintAndCut_layout

My hybrid process involves using my Silhouette to cut out my digital items, but I want to stress that anyone can do this and hand-cut the items out with scissors.  I open the file up in my Silhouette Software.  Then I use the Trace function to create cut lines for each element.  Sometimes the trace function is finicky, so you sort of have to play with the sliders.  In general I uncheck “High Pass Filter” and just play with the “Threshold” slider.  Once you see the objects are yellow, you can click on the “Trace” or “Trace Outer Edge” buttons to get your cut lines.  You can also use the Offset function if you want your cut-out shapes to have a white border.  Before printing, make sure you click on the Registration Mark window and click the box to Show Reg Marks.  The registration marks are the black “L” shaped items in each corner of the page (except the lower right) that helps the Silhouette’s optical scanner determine the location of your items to cut.  You have to send your page to your printer with the registration marks showing in order for it to print out with the marks.

20150307_Together_SilhouetteTrace

After you print your page, put it on your Silhouette mat and load it into the machine.  Silhouette Studio software should ask you if you want to detect the registration marks automatically and you say yes.  Once registration marks are found, you can proceed to cut.  Here are my items after my Silhouette cut them out.

20150307-2015-03-07 12.07.27_OLB_CN

Now I’m ready to assemble my layout!

20150307-IMG_5398_OLB_CN

I love how much dimension you can give a hybrid layout just by using different sized items and adhering them with foam adhesive to pop them up, or use staples to attach them.

20150307-IMG_5403_OLB_CN

I like to add some items of different textures, such as the gold thread and the wire mason jar.

20150307-IMG_5408_OLB_CN

Being able to print the digital stamps and journaling right onto my cardstock background really makes me happy!

20150307-IMG_5407_OLB_CN

Final touch I added some sequins to create interest and draw the eyes around the page.

20150307-IMG_5404_OLB_CN

I know this post was long, but I hope you enjoyed a look into my hybrid process to turn digital items into physical items to make a hybrid scrapbook page!

One Little Bird digital kits used:  Better Together digital kit, Better Together journal cards, At Week’s End digital papers.

Read More »

Tuesday, March 17, 2015

Bella Blvd | Bella Of The Ball

BELLA OF THE BALL

Hi Everyone!  I had the pleasure of creating two scrapbook pages for the Bella Blvd March newsletter!  I am the “Bella of the Ball”!  I created two layouts with their new spring collections “Campout”, “Simply Spring”, and “Color Chaos”.  To see the newsletter, go here.

The first layout is about the time when we went to San Francisco and hiked at Muir Woods.

ChristineNewman_MuirWoods_01_600

I used a Silhouette cut file to cut my background white cardstock and filled the back with different patterned papers.

20150222-IMG_5355_CLN

ChristineNewman_MuirWoods_02_600

I adhered the papers with some foam adhesive so that the white cardstock looks more dimensional.

20150222-IMG_5358_CLN

20150222-IMG_5356_CLN

The 2nd layout I did for their newsletter was “Splash of Fun”.

ChristineNewman_SplashOfFun_01_600

I love that Bella Blvd has clear overlays now too!  I thought this page was fun and very summery.  I used different patterned papers for layering, and enamel shapes to create texture.

ChristineNewman_SplashOfFun_02_600

The letters were cut using patterned papers and adhesive foam with a Lawn Fawn die set.

20150222-IMG_5371_CLN

It was awesome to work with these new collections from Bella Blvd!  They are available at most scrapbook retailers.  You can buy them from the Paper Issues store for 20% off using my code LISTGIRL!

Read More »

Friday, March 13, 2015

Evalicious | Birthday Cupcakes

20150305-IMG_5383_CLN

Hey everyone!  I am on the Evalicious blog today with a layout about some birthday cupcakes!  Back in February I surprised my Todd with some cupcakes at work so he could celebrate his birthday with his work friends!  The whole thing was a huge success and he was really surprised when I showed up at his work with cupcakes and a big birthday balloon!  Since the subject matter was cupcakes, I thought it would be fun to play with circle shapes.  I used my Silhouette to cut out a few circles on my white cardstock background.  Then I adhered pieces of patterned papers behind them to fill them. 
20150305-IMG_5374_CLN_600

I used journal cards, circle tags, wood veneer, paper clips, and a doily to add texture to my page.

20150305-IMG_5377_CLN

To add to the circle theme, I added a badge button from Field Notes Badge Buttons V1. 

20150305-IMG_5380_CLN

I also added some gold puffy stickers, ledger alpha puffy stickers, and some journaling. 

20150305-IMG_5382_CLN

Evalicious products are fun to play with to add different textures to your page!  :-)

Thanks for stopping by!


Evalicious Products Used:


photo shoot large tags

photo shoot round tags

Gold Misc Shapes Puffy Stickers

field notes wood veneer

field notes badge buttons v1

field notes snipsnip page tabs

arrow love shape clips

Ledger Alphas Puffy Stickers
Read More »

Tuesday, December 23, 2014

One Little Bird | December Project Life Page

20141222-IMG_4986_CLN

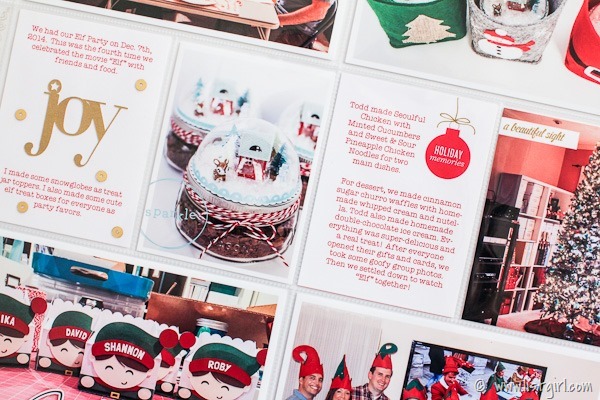
Hi Everyone!  I am on the One Little Bird blog today with a Project Life page about our Elf Party!  This is the fourth time we've had a December "Elf" movie watching party at our house, so it is definitely a tradition with friends!

20141222-IMG_4976_CLN

I combined several different ways to use digital supplies on this page.  I used my Silhouette Cameo to cut out the word "joy" from The Two Five cutting files.

20141222-IMG_4983_CLN

I also love typing out my journaling cards before printing them out, so I used the "joy" png file as a placeholder in Photoshop so that I can type my journaling around the word.  Then I hid the layer with the word "joy" and printed the journaling out.  After cutting out "joy" with gold paper, I adhered it in place and added some gold sequins.

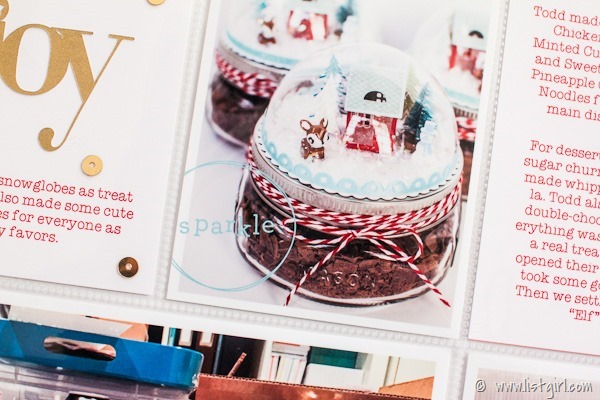
For this 3x4 photo, I used a template from Photojournalist Vol. 01.  I recolored the "sparkle" circle by sampling the light blue in my photo.

20141222-IMG_4993_CLN

This 3x4 journal card was originally 4x6 in the "There's Something About Merry" journal card pack.  I cut it down to 3x4 in Photoshop, moved the ornament to the right, and typed journaling before printing it out.

20141222-IMG_4998_CLN

On the tree photo below, I added the "a beautiful sight" label from "There's Something About Merry Elements" right onto the photo in Photoshop before printing it out.

20141222-IMG_4994_CLN

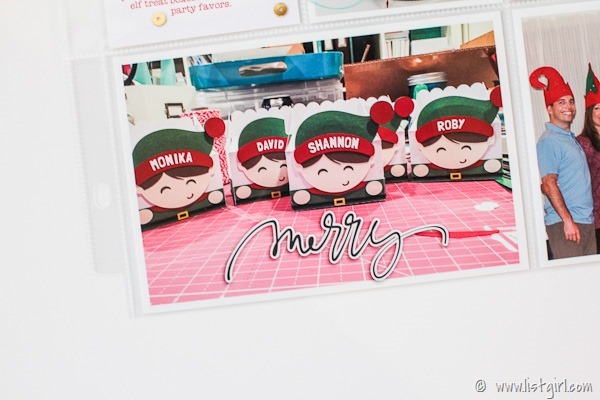
One other thing I love to do is use digital word art right onto the photo.

20141222-IMG_5003_CLN

20141222-IMG_5002_CLN

20141222-IMG_4999_CLN

Just for something different, I put a shadow on this digital word sticker before printing the photo out.

20141222-IMG_5000_CLN

Supplies Used: Photojournalist Vol. 01, The Two Five Cutting Files, There's Something About Merry Elements, There's Something About Merry Journaling Cards.

Thank you so much for stopping by!  Happy Holidays to you and yours this wondrous season!

Read More »
[feedly mini]